Assignment
![]()
1.1 Google Cloud & Google Kubernetes Engine (GKE)
This week you will be introduced to the Google Cloud Platform. We will learn the basic concepts of the Google Cloud and the most important Google services.
If you’ve already a basic understanding of Public Cloud Concepts than you may skip the first two basic courses.
- Complete the course Essential Google Cloud Infrastructure: Core Infrastructure via Google Skills.
- Complete the course Essential Google Cloud Infrastructure: Core Services via Google Skills.
Now you’ve basic understanding of the Google Cloud, let’s jump into Google Kubernetes Engine (GKE).
- Complete the course Getting Started with Google Kubernetes Engine, incl. labs (12 credits), via Google Skills.
You need to add the Proof of Completion (Course Badge) badges to your portfolio.

1.2 Kubernetes
To complete the first week’s assignment, we want to apply the knowledge of Kubernetes and gain more in-depth knowledge of Kubernetes.
We need a Kubernetes cluster for that. This can be obtained in many ways. For example, by using cloud services or simple installations such as minikube. However, then a lot happens underwater and we don’t get the best basis to learn how it works.
We are therefore going to install a full cluster on Ubuntu minimal 24.04 LTS instances (1 masternode and 2 workernodes) with kubeadm.
Of course, you can use all kinds of sources for this, such as chatgpt or manuals on the internet. Also study the relevant topics from the ebook Production Kubernetes (see Brightspace).
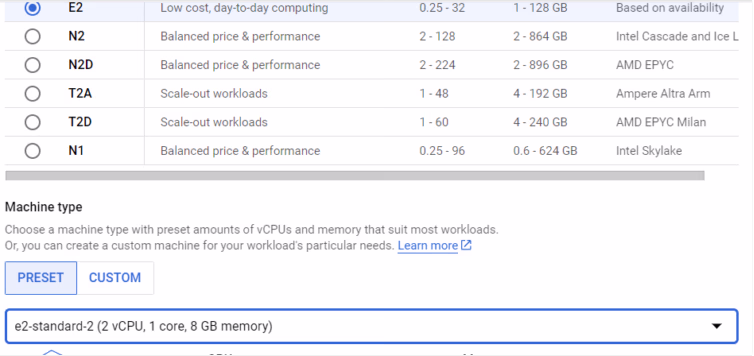
- Create three Ubuntu 24.04 LTS minimal instances in Google (choose type e2-standard-2 as node) and choose Ubuntu 24.04 LTS minimal as OS. To see that a virtual network in Google directly connects multiple regions, you can place the master in the Netherlands, a node in Brussels and a node in London.
Install a Kubernetes master and 2 Kubernetes workernodes.
A good guide is: https://hbayraktar.medium.com/how-to-install-kubernetes-cluster-on-ubuntu-22-04-step-by-step-guide-7dbf7e8f5f99
Do use the Flannel CNI otherwise the communication between pods on different nodes may not work.
In Brightspace, bash scripts installmastertemplate and installnode are given.
Installmastertemplate still needs to be modified (uncomment the correct lines as indicated at the top of the file) and then run on the master. installnode must be executed on the nodes.
After this, the nodes must be added to the cluster with the command that is visible on the master after executing the script:
sudo kubeadm join ....If it is not visible, give the command on the master:
kubeadm token create --print-join-commandExplain what the kubeadm init command does (and why it only needs to be done on the master) and explain what the following command does (the CNI must be installed on the master after the nodes are added). What other network CNIs are there?
kubectl apply -f https://raw.githubusercontent.com/flannel-io/flannel/master/Documentation/kube-flannel.ymla) Once installed, you should have a well-functioning cluster.
First check that on the master with the command:
kubectl get nodes
Use the following command to check which pods are running in the namespace kube-system. It should look something like this:
kubectl get pods -n kube-system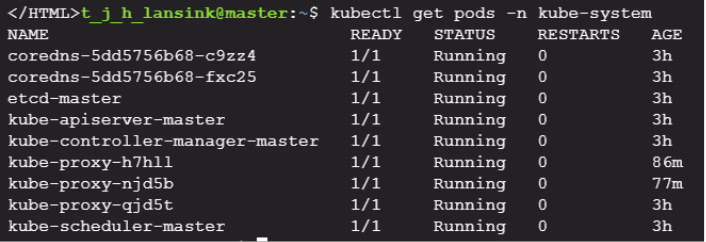
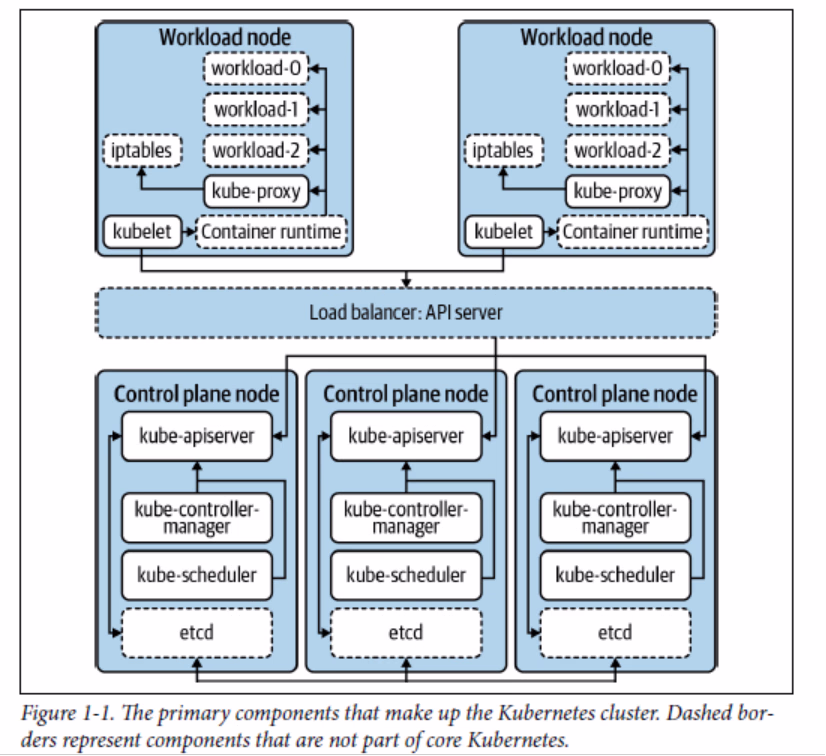
Explain these pods using the figure below from the book “Production Kubernetes”:
- We now want to run a containerized application in this cluster.
On Brightspace a Dockerfile for the application and a index.html file have already been provided.
Examine the Dockerfile and explain how the application is built and what it does.
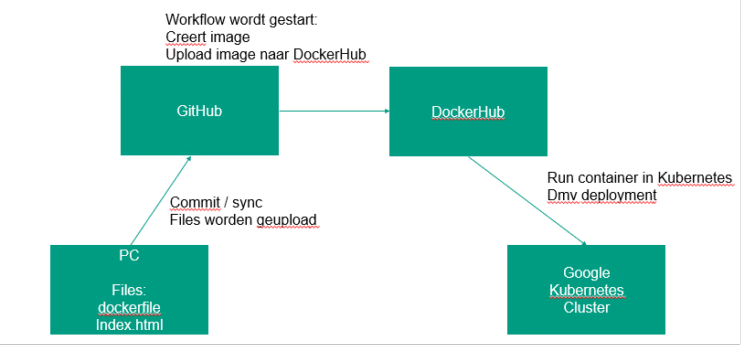
We use GitHub to automatically create an image when the code (index.html) is modified and the image is then stored in DockerHub.
After that, we can run the image in the Google Kubernetes cluster. It is shown schematically below:
Create a repository in GitHub (e.g. called “container”). Make sure git is installed on your PC and clone the GitHub repository to your own PC and place the Dockerfile and the index.html file there.
Also create a repository in DockerHub where the docker image should be placed after a build. Create a workflow in GitHub that builds a new image when the Dockerfile is modified and uploads it to the newly created DockerHub repository.
Start with the blank workflow template: https://github.com/actions/starter-workflows/tree/main/ci
Customize this workflow so that the final steps look like this:
steps:
  - uses: actions/checkout@v4

  - name: Login to Docker Hub
    uses: docker/login-action@v2
    with:
      username: ${{ secrets.DOCKER_USERNAME }}
      password: ${{ secrets.DOCKER_PASSWORD }}

  - name: Build and push Docker image
    run: |
      docker build -t <dockerhubaccountname>/<repository>:latest .
      docker push <dockerhubaccountname>/<repository>:latest
Make sure that the secrets are set in GitHub (under Settings > Secrets and Variables > Actions > Repository Secrets) and that the Docker account and repository are adjusted.
Commit the files Dockerfile and index.html to your PC and push it to GitHub. The workflow should now be kicked off so that a docker image is created in the DockerHub repository.
We now want to run this image (which is a web application) in a pod in Kubernetes.
Create a deployment.yaml file for the newly created image (e.g. create 2 replicas). The first part of this file looks like this:
apiVersion: apps/v1
kind: Deployment
metadata:
  name: myfirst-deployment
spec:
  replicas: 1  # Number of instances (pods) to run
  selector:
    matchLabels:
      app: my-container
  template:
    metadata:
      labels:
        app: my-container
    spec:
      containers:
      - name: web-app
        image:
a) Study the structure of this file and explain the various parts.
Complete the deployment file by filling in the image and adding which port to use (port 80). Create two pods using the deployment file by using the command kubectl apply -f.
b) Investigate whether the pods are running and investigate the IP address of the newly created pods.
Access the web server in the pod by issuing the following command from a node where a pod is running:
curl <ip-pod>Show what the output is.
c) Also, log in to the pod from the master with the command kubectl exec and verify that the directory /usr/share/nginx/html/ exists, and use cat to view the contents of the file index.html.
We now have a running cluster with a simple application running in it. The container for the application is created via a workflow so that every time the code is modified, the container is recreated on DockerHub. The container is not yet rolled out automatically.